Friday, February 25, 2011

Let There Be COLOR

I'm so excited to share our painting progress in the basement! I really couldn't wait to get that first splash of color on the walls!! I started out in the family room with the cork color on the wall adjoining the bedroom. But the really exciting step was the morocco RED!  BAM!!


I actually convinced Eric to help out too!! (Told you he does all home renovation work in his scrubs...)
The cork color has just the right blend of being unique but still comfortable and warm.


I really like how the bright red wall makes the fireplace pop. The cork color is actually quite similar to the brick color, so I think it would have just blended in without the accent wall.


I actually really didn't like the brick color before the red paint. I always thought it looked pink/peach-ish (definitely not my thing), and now looks much more earthy in color.


We even got our friend Steve to paint the trim pieces for us. Just look at that intense concentration. Eeeekkkk.... don't hit the freshly painted walls !! 


Speaking of trim, I convinced Eric we decided to go with a chunky white baseboard (love love love)!! So much nicer than the small dark wood baseboards we have throughout the rest of the house. Eventually we plan to replace all of those with the big white ones (obviously a project for another day). 

The carpet is being installed in a little over a week. We picked one from Home Depot with a fairly long fiber and pretty dense weave, so it should be nice and soft (and warm)! Here is a sample, just to give you an idea of what it will look like when it is all installed. 


Oh, I almost forgot to show you the grass cloth color on the bedroom walls. I had to use a flash because this room doesn't get a lot of sunlight, so the color isn't exactly like in the photo, but I really like how it turned out.


It feels great to finally have color on the walls. We are soooooo close to having our basement back!

Wednesday, February 23, 2011

Basement Progress

I know it has been a while since I posted about the basement. But - we are getting really close to completion folks!

Last time I left you, we had just finished adding drywall to the ceiling and walls. You can see particularly on the ceiling that there were some serious seams between the drywall pieces.


Well, since then, a whole lot of mudding and taping occurred (thanks dad)! That involved a lot of time on my dad's part, much of it up on stilts, like this (he's actually putting up tape in the photo, not mud):


And you should know, ladies and gentlemen, that this is NOT easy. I gave it a try and ended up with taping compound all over the floor (and all over me too). Thankfully, my dad is basically a pro at this, so we ended up with smooth smooth walls!


The next step was adding the knock-down texture on the ceiling. The trickiest part was actually the prep. We taped off the ceiling with paper and painter's tape (you can see it in the above photo). We used a fun little gadget to apply the tape and paper at the same time:


Then we added thin plastic to cover the walls and thicker plastic to cover the floor. My mom helped out a lot with this part too.


Gizmo thought the plastic was great fun. He kept running around between the wall and the plastic!


Adding the texture was fairly simple. We used a texture sprayer with an air compressor and added in the taping compound. The spray was applied slowly and evenly, and after waiting for it to dry for about 20 minutes, we used a knockdown knife to flatten out the bumps (of course I forgot to take any photos of this part). Next we had to put 2-3 coats of primer on the ceiling and 1 coat on the walls. Here I'm adding primer to the wall and ceiling corner. The ceiling texture is there, but hard to see at this point (especially with all the drywall dust on the camera lens).


We thought (and argued) a LOT about what colors to paint the walls in the family room and bedroom. The final decision was to paint the family room the cork color from Behr and have a morocco red accent wall along the fire place. We wanted something coordinating, but not too matchy for the bedroom, and ended up going with grass cloth. We are thisclose to finishing the painting. I'll update again soon to show you how our color choices actually look on the walls. For now, this will give you an idea.


Thursday, February 10, 2011

A Fully Functional Kitchen!

Whew! It has been a busy couple of weeks for me. Last week I was in Chicago prepping for an interview that I had earlier this week. The good news is that it went pretty well, but I won't hear back for a couple of months...

So, there has not been a ton of progress on house-related projects, but I do have a few updates to share. The basement renovation is also getting really close to completion. We're in the process of painting and just scheduled someone to come and measure for carpet. I'll share more deets on that soon in another post. What I am really excited to tell you about is how our kitchen is now fully functional for the first time!!!!

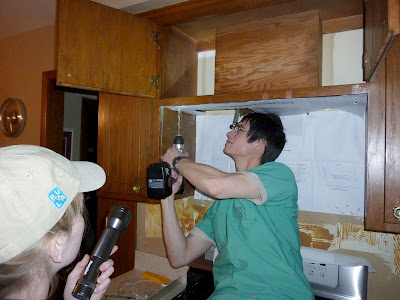
Mounting the microwave was actually the easiest install of all the appliances (but again we had help from dear ol' dad!). Using the template provided in the box, we attached the mounting plate to the wall and drilled holes in the upper cupboards:


Yup, that's me holding a flashlight. Remember how little light we have in our kitchen? Just one bulb above the sink. So the flashlight was necessary. Luckily the microwave also has a light, so we have now doubled the light in our kitchen!


If you ignore the horribly ugly back splash (or lack-there-of), it's looking pretty awesome! And wow is it nice how microwaves can re-heat leftovers!!! So much faster and more convenient than the stove top. Here is that side of the kitchen before:


During:


And after:


Much better (and more functional)! Hopefully we'll start to look into cabinet options in the next couple of months and maybe figure out some way to disguise that back splash in the mean time.